Showing posts with label DIY Projects. Show all posts

Sunday, November 24, 2013

Christmas Crafting: Christmas Cards

As the holidays approach, I am working on a plan to keep them manageable. Last year's Christmas was pretty reserved. We decorated the house right after Thanksgiving (as I like to take things one holiday at a time), I made a few new projects and sent out cards, and that was it. No major projects. I made this wreath and that was kind of it. I had vowed to not spend a ton of money on crafts, and have the same plan for this year. I figure that if I add just a few things each year, that will keep it manageable.

One thing that I am not making this year is our cards. Thanks to some pretty awesome engagement photos from Lisa Mathewson, our amazing wedding photographer, we decided to go with the printed cards versus the homemade ones. Who knew we were somewhat photogenic? I like this one...although it's not the one we used for the photos.


Honestly, I'm excited because, not only do I love our pictures, I am also glad to have one less project. That leaves more room for cookies and other things.

Vistaprint sends lots of coupons and seems to always have an offer on Living Social or Groupon, so we went with this design:


I love it so much! Even the back is cute. Can you guess which one of the engagement photos that we used?

I realized though, I never shared last year's cards, which looked like this:


I found a picture for these string art cards online last year, and thought it was worth giving it a shot. Although they look like a more simple design, they proved to be harder than I thought to actually make. In terms of supplies, I just used blank cards thread (lots of it), a hole punch, two stamps and some red ink. 

I set up an assembly line on the kitchen table. I started by stamping the inside of the cards and the envelopes. They never dry as quickly as I expect, so I spread them out and tried to keep track of the order that I stamped them. 

Then I began the punching with my tiny whole puncher. I did a double punch on the top to make sure that there would be enough room for the overlapping string. Then I punched six holes across the bottom, as evenly spaced as I could without measuring it all out. 


Then I stuck a glue dot directly under the top hole on the inside and began stringing. I started by sticking the string into the glue dot, working from the far sides in, with the string crossing over the front and down, then back up on the inside. The string then ended in the middle, stuck on top of the glue dot.

Each thread portion got me through a few cards. Unfortunately, there were times when I would be almost at the end of the card and realize that the amount of string left wouldn't finish at the top. This is where it wasn't quite as easy as expected. I also would imagine that some folks may have gotten a card with a string that had come undone. Creative but temperamental.

If you don't have a Christmas card plan, consider giving it a shot.

In the meantime, it's back to my planning and prioritizing. I'm thinking just two-three crafts for this year. Stay tuned.






Wednesday, February 27, 2013

Winter Pinterest Challenge: All Dressed Up

Oh, you were looking for a post-30th birthday post? Sorry, it might be another minute....

But instead, let's get crafty!


I have been itching to take on a creative project, so I was so excited when the latest Pinterest Challenge was announced. Great motivator to get off my butt and make something...as long as it was something I could finish while watching tv, of course.

There are pictures all over Pinterest of some fancy dressed up bookcases, which were totally inspiring and seemed like a fairly doable project for me. Here is my favorite inspiration post:

Thanks for the inspiration, In My Own Style!
I happened to find a cute patterned roll of wrapping paper at Target that was only $2, and a perfect fit for our little black shelf in the living room. And it followed the same pattern as my inspiration photo.

Check it out now!


The project took me the length of a tv show, and was super easy. I just measured and cut pieces of the paper to fit, and then taped them to the cardboard back. Some of the other tutorials suggest using fabric and covering cardboard to inset into the shelf. I was lazy, and this was easier. Plus, it was a $30 Target shelf that I've had for quite awhile. It was already looking pretty beat up from the move. Now it looks classy.

Huzzah. I love a good quatrefoil print.

Have you made anything lately? If you would like some ideas, check out the Pinterest Challenge from Sherry at Young House Love, and all of the other linked projects.

Wednesday, November 21, 2012

Pinterest Project: Tiered Stand

My DIY To-Do List has been growing, with limited time for new projects. Which is hard, considering I just got my copy of Young House Love by John and Sherry Petersik. If you haven't seen it, you need to pick up a copy of your own. Lots of great inspiration.

I had a little bit of time last weekend, and decided to finish a quick project that I had been planning for over a year, based on these inspiration pictures:

From here
From here
From here.
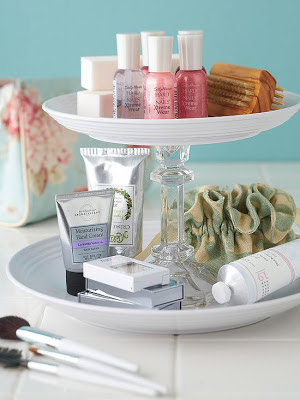
Who doesn't need a functional tiered stand, made from two Target plates and a cheap Walmart candlestick?!

Here is my version, made in 10 minutes with a few glue dots holding the thing together:


Fantastic jewelry holder. And these plates are the inspiration for the new color scheme that I am hoping to make happen in the master bedroom in our place, which is totally blah right now. I am thinking this will be a good project for over the holidays. Stay tuned!


Tuesday, November 20, 2012

Christmas Crafting: Santa Wreath

One of my self-imposed rules for Christmas this year is not to go overboard. I love all things Christmas - cookies, decorating, gifts, etc. - but it can get very overwhelming. When it comes to new decorations, I am trying to utilize the ones we already have and make just a few new things. Sadly, this means I didn't buy the gorgeous chevron tree skirt that I found on Etsy. Womp womp. So pretty. I guess I'll just wrap some fleece blankets around the bottom again...

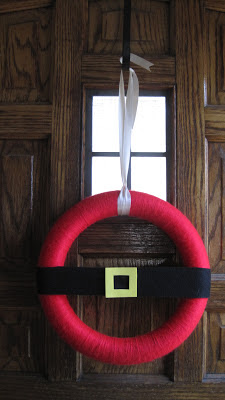
Anyway, my plan for this year is that I can be creative with all of the supplies filling my craft drawer (and wheelie suitcase, and front hall closet...). Which was perfect for making my very own Santa wreath from this Pinspiration!

I already had a skein of red yarn sitting around, and I had purchased two wreath forms from my last wreath project. Which meant that all I had to do was spend some time wrapping the thing with yarn while watching this week's Scandal and Grey's Anatomy on Sunday afternoon, and I was close to finished. I just added a felt belt with a little buckle made from yellow craft foam, and voila.


I love it, despite the fact that Chris told me it was a very nice steering wheel cover... Boo. Definitely an improvement from my last wreath-making experience.

Now if only I could figure out how to DIY my own chevron tree skirt....

Thursday, November 8, 2012

Counting Stitches

As I sit in the midst of writing my dissertation proposal, you might think I am crazy to try to squeeze in some crafting. With everything else on my plate, why would I take on more projects?

In reality, I find crafting to be great stress relief. In fact, one of the ways that I calm my brain down so that I can get a good night's sleep is by cross stitching. Yes, another new hobby that I have picked up. I grabbed one of these little kits from Walmart a few weeks ago, and found it to be a really easy and relaxing. Minus the fact that I cannot do a french knot to save my life.

Kitty
All I can focus on is counting while doing it, so I am not worried about those things I have to do at work the next day, or the next sections of my proposal that I want to work on. Counting stitches seems to be better than counting sheep.

Maybe it's a little cheesy. Yes, it is a hobby for Grandmas - my Grandma Ruby has been making beautiful cross stitch pictures for years. But right now, it's easier to pick up and put down than knitting. And it's a better pre-bedtime activity than cardmaking or scrapbooking. Plus it is much cheaper than some of my other hobbies. So it's what I'm doing.

Please let me know if you would like a tiny cross stitch, because I am working on a cupcake right now, and not really sure where I am going to hang all of these things.

: )

Wednesday, November 7, 2012

Christmas Crafting: DIY Snow Globes

Yes, I realize that Christmas is still a long time off. No, I have not starting decorating my house. I love my fall decorations too much to take them down before December. But December 1st, these bad boys are coming out:


Another quick, fun, as-seen-on-Pinterest project. Snow globes in mason jars. I basically just used some glue dots to fasten some toys, ornaments to the jar lids, then dumped in a bunch of snow-like glitter. Sealed the jar, and dunzo.

I actually first attempted this project a few weeks ago, as a gift for a friend. I made the mistake of adding water to the jar and sealed the thing with Gorilla Glue. The dye in the tree immediately turned the water blue. At first it looked cool. Then it became really cloudy and gross and the Gorilla Glue puffed out and turned orange. Ick. I told her she could throw it away.

Sure, my glitter may not float. It may not be a "true" snow globe. But I still think these things are cute. I may just have to make a few more.

Tuesday, October 30, 2012

Pinterest Challenge: Fall Wreath

It's that time of year again! Sherry from Young House Love and Katie from Bower Power have extended the Fall Pinterest Challenge, and I jumped on board.


Between writing my dissertation proposal, work, and attending Badger games, I haven't had a whole lot of time for anything DIY lately. I have several smaller projects on my To Do list, like Christmas cards and some handmade gifts, as well as a few larger projects, like curtains for several rooms and redecorating our bedroom. Totally reasonable things to squeeze in between a literature review, right?

So this Pinterest Challenge came around at a perfect time to throw in something small, like fall decorations. Nothing too time intensive.

I currently have an entire Pinterest board dedicated just to DIY wreaths. Nevermind that, of course, I have never made a wreath before. But isn't that what Pinterest is for? Taking on new craft ideas, day by day. And really, how hard can it be to wrap ish with yarn?

Here were some of my inspiration pictures:

From I Heart Naptime
From Someday Crafts 
From Etsy
From For Mamas
To keep my costs low, I decided to use some fall yarn that I had leftover from a few other projects, including these knit pumpkins/squash:

Yes, I actually knit these, back in the day.
And these felted nesting bowls:


I grabbed a foam wreath, and got to wrapping. This was the perfect project to do while I caught up on Once Upon a Time and Revenge from this week. It really only took an hour or so. Ta da:


Easy peasy pumpkin wreath. It's cute. I like it. But I will say, I think it needs a little something extra. Embellishments of some kind. Perhaps some felt leaves to add some flourish. A project for another day.

I am already planning ahead for a Christmas wreath. I'm thinking Santa's belt looks pretty awesome.

Check out the Pinterest Challenge projects here: Sherry, Katie, Carmel, and Sarah. Theirs are significantly cooler. Plus, they each have a whole link party. Enjoy!

Back to writing. Current page count: 15


Tuesday, September 11, 2012

DIY Fall Decor: Festive Pennant Banner

I have had the itch to do some crafting lately. I know it may seem a little early, but I just could not wait to get the fall decorations out. Fall is by far my favorite season. I love everything about it. Why not celebrate throughout the house?!

I decided to make a quick, easy pennant, using just scrapbook paper and twine. Easy peasy. Just a little bit of measuring, cutting, hole punching, and hanging. Done in less than 30 minutes.

Check it out:


Sorry for the horrible lighting. Silly iPhone pics.


Happy Fall y'all!


Tuesday, July 10, 2012

Pinterest Challenge


So two of my favorite bloggers, Sherry from Young House Love and Katie from Bower Power, have issued a new edition of their Pinterest Challenge: a call to actually make something with all of those pins that you have hanging out on your Pinterest boards. I have always had the good intentions of participating in the three previous challenges, but could never get my act together to do it in time.

I actually was mostly inspired to do something this time, when Sherry wrote that she planned to paint something and make some wall art. I have had six blank canvases of various sizes sitting in storage for awhile now, waiting for some paint to make them pretty. Plus, we were looking for a few more pieces to round out our gallery wall. Which actually is not anything yet - all of the pictures are sitting on a shelf, waiting to be hung. Procrastinate much? Yep.

One of the specific pins from Sherry was from Diane at Home Sweet Homemade. Sherry had pinned this picture that Diane made, using a toothpaste cap as a stamp, of sorts.

Stamp Art from Home Sweet Homemade. See the details here. 
Seemed easy enough. And it reminded me a lot of an art idea that I had pinned to my Wall Art-DIY board from Pawley's Island Posh. I don't know if these were actually DIY, or expensive art, but they provide great inspiration!


I decided that I would do a similar pair of canvases, with two different sizes of circles. I already had all of the supplies needed: a container of red acrylic paint, two 8x10 stretched canvases, a paper plate for my paint, and some newspaper for floor coverage. For my smaller circles, I started with the top of an empty mouth wash container. A tall mug worked for the larger circles. 


Getting started was pretty easy. Paint on plate. Dip mouthwash lid in paint, and go!


I intentionally started my circles off the edge, because I didn't want the circles to be perfectly lined up. I really like the big rough edges, and a few unintentional drips.


I staggered my lines as I went.


As you can see, it is definitely not perfect. Some of the circles are not totally complete, or heavier on different sides. But I like that even more. 


I left that one to dry and switched to the mug. 


I started in the middle of the picture, so that it didn't follow exactly the same pattern as the smaller circles. This one went very fast. 


After letting them dry overnight, they now look like this:


Love em! We still have to hang everything. But I think they will be a great addition to the wall. 

Thanks to Sherry and Katie for hosting the Pinterest Challenge. It was so fun! Here are the links to their projects: Sherry, Katie, and Kate and Michelle, who hosted with them this time. Check out the creative stuff they have made.

Have you made anything from Pinterest lately?

Oh, and the giveaway winner will be announced tonight! I know you are on the edge of your seats...


Monday, July 9, 2012

DIY Project: Summer Camp Card

Did you go to summer camp?

We did. Good old Catholic Youth Camp on beautiful Lake Panorama. One week out of each summer from fourth grade (maybe fifth), until high school. I loved everything about it. Swimming. Canoeing. Making friendship bracelets. Meeting lots of new friends. Eating the delicious food. Seriously, our camp food was really good.

One of the other best parts of camp - getting mail. It was always a big deal to hear your name during the mail call at lunch, and then read a nice note, and maybe get a couple extra dollars for some candy at the canteen. Oliver, a family friend, who is nine is currently at his first overnight camp experience. Last night, I crafted a quick card to get in the mail to him tomorrow. I want to make sure that he gets it before he leaves later this week.


I bought that pack of stickers forever ago. For some reason, I wanted the sleeping bag sticker. Glad I had them now and could finally put them to use. 

I hope Oliver has an amazing time at camp and that he tries lots of new things. The kid is pretty fearless and very athletic and outgoing, so I would imagine he's having a blast. Can't wait to hear all about it! 

This is the first of a bunch of DIY Projects I have coming up this week and next. Stay tuned! And if you want to make a DIY of your own, enter the Cupcake Kit giveaway. I'm picking a winner tonight, so enter soon!


Monday, July 2, 2012

Cupcake Fun and a Giveaway!

I had a lot of fun sharing different cake decorating tips last week, and thought I would turn my attention to my favorite form of cake: cupcakes!

I had the opportunity to go to one of my favorite cupcake cafes when I was in St. Louis last week, The Cup. Their cupcakes are gorgeous in a really simple way, and also delicious. Check out this baby:

When I took the cake decorating class a few years back, I was most excited about our last class, which focused entirely on cupcakes. It was so much fun to see the different things that you can create, simply by changing out the tips on the piping bag. I usually focus more on taste than toppings, but it is really fun to see what you can create. Here are a few:

This ladybug was just a smooth layer of red icing, a line and a few dots with chocolate icing, and then a chocolate drop and some white dots, which you can get at the craft store.  


 You can also bake cupcakes into an ice cream cone, and then top with frosting using a 1M tip (the big star). Topped with some sprinkles and a cherry = awesome! The 1M tip is the one that makes the nice big icing swirl on top of the cake. Much prettier than plopping down icing with a spatula.

Our instructor also made a delicious chocolate mint mousse-like icing for this one, which is my "ice cream." She also used this as a cupcake filling. It was surprisingly easy to fill cupcakes without making a mess, using the Bismarck tip. Give it a try!


So I will own that I didn't make this one, the instructor did. She showed us how to do a bunch, and then let us take her examples home. This sunflower was made with a leaf tip and yellow icing, followed by some small dots of chocolate. You could also do mini chocolate chips for the center. That leaf tip is great for making a lion face too.

Another fun tip for cupcakes is the grass tip, which can either do something like this...
From Lace Bakery
Or you can make muppet fur!
From Bake Factory UK
Pinterest is a great source of inspiration for cupcake decorating. Here are a few of my favorite pins that I would love to try. I have a lot of cupcake recipes saved for different flavors, these are more focused on the decorating piece.
Minion Cupcakes (made with twinkies) from Do It and How


Caramel Frappuccino Cupcakes from Pixie Crust

Stuffed Carrot Cupcakes from Cupcakes Take the Cake (The carrot is actually a chocolate covered strawberry!)


I am inspired to get my bake on.

So, for all of you blog readers out there, it is time for another giveaway! And if you haven't guessed it, this one is all about cupcakes!

The Goods: To help you decorate some cupcakes of your own, this giveaway comes with four essentials:
  •  Wilton 12-piece Cupcake Decorating Set. Includes star tips 1M (rosettes, stars, drop flowers), star tip 22 (zigzags, pull-out stars), round tip 12 (outlines, dots, messages) and Bismarck tip 230 for exciting filled cupcakes, plus 8 disposable bags, and an instruction booklet.
  • Wilton 4-pack of couplers. (Couplers hold your tip onto the piping bag, and are super helpful.)
  • Wilton Garden-Tone 4-icing gel colors set. Colors include Buttercup Yellow, Aster Mauve, Delphinium Blue and Juniper Green in 1/2 oz. jars. These are the best colors to use to create vibrant icing.
  • Festive plaid cupcake wrappers. These will make some happy cupcakes. : )
(picture of the giveaway coming soon - had some trouble uploading pictures last night)
How to Enter:
This is where you have to come out from the shadows. I know you are there readers, but you will have to make yourselves known to enter. There are two ways:

1. Follow/subscribe to my blog (click Join This Site on the right), and shoot me a comment so I know you are subscribing (I can't always tell if you are a new follower, plus this helps me know that my current followers who are also interested) - Counts as one entry!

2. Add a second comment on this post with a recipe for your favorite cupcake, or one you plan to try (links are cool) - Counts as one entry! (Make sure I have your name too)

I will draw a winner next Monday and make arrangements to get this fun little kit to you. No worries, you can still enter if you live outside of Milwaukee, but in the United States. Sorry, no international shipping.

Know that I love things like random number generators, so I promise that all drawings will be totally legit. No funny business.

Good luck! 
Related Posts Plugin for WordPress, Blogger...